Friday, February 25, 2011

and now, number 7!!!


Hi everyone,
It has been a busy couple of weeks....after I got back from Carol's I had to get ready for my two day class with Jeff Devers. We were going to making boxes with lids....Jeff does some of the most amazing boxes out of polymer clay. We started by making a box out of card stock and then covering them with clay and baked them. We used these as our interior molds. We built up our boxes in layers with a lot of baking and sanding in between (good thing we had a day off to catch up on our "homework"). We then learned how to make two different kinds of fitted lids. It was interesting to see how Jeff works and how he pays so much attention to detail. I would show you a photo of mine but I loaned it to my gal, Gloria, so she could work on her next step.....when I get it back I will put on a decorative layer, bake and sand again...then I will post a photo of the finished piece! Something to look forward to!
In between getting ready for the workshop and the couple of days after, I have been busy in the studio when I haven't been in bed with the flu. I finished off 4 rings that I had in various stages of being finished, and 1 completely new one, so now I am not behind on my RAW!! So, I will start with the new one.....really simple...I had a wonderful piece of copper metal clay that I had textured in Gordon's class with the tearaway method last Feb. I antiqued the surface with acrylic paint and then heat set it before sanding the surface lightly with sandpaper to bring out the details of the little angel. I also had some little bits of already fired metal clay and one of them was a #7 and was just the right size to use on the surface, so I antiqued that with the same colors of acrylic paint. If you look closely, you will see that the little angel looks like he is holding the big ball with one hand and throwing a little ball up in the air with his other hand. The little ball is actually the rivet that holds part of the ring together. Since I don't solder, I needed to figure out how to attach the shank to the band. I decided to use the holes in the #7 disc and the upper right hand corner, which worked out to look like he was tossing a ball in to the air. I liked the way a bit of the band peeked out of the far edge and decided to keep it and then added a little amethyst stone to the sterling band. The little tab also holds the ring in place and keeps it from spinning. It is quite comfortable to wear even though it is off center.
So, for ring number 8, I had a ring cut out from a Faux Bone blank and had experimented with coloring the surface last summer. It has been sitting on my worktable just waiting for the right little something. When I had found my little number 7 disc, I had also found some of the long fragments that I used to make for earrings. I also had a large disc...I hammered that into a bowl so I could set one of those rivoli stones into it and I had a purple one that worked with the surface of the already dyed faux bone ring, so I started assembling the ring. I used two long fragments on the sides and used some sterling headpins to attach everything together. I then found a smaller fragment that fit in between the two that worked out well. When those were attached, I drilled a hole in the faux bone with a round tip bur and set the bowl into it after doming the center section in a smaller divot to conform the bottom of the bowl. I then set the rivoli in and chemically bonded the whole thing together. Yes, I know, it is the easy way out, but have you ever tried to rivet on a ring band? It is hard to flip the ring and hammer on the inside of the band....and since I had to use epoxy to glue the rivoli into the bowl, I really didn't mind.
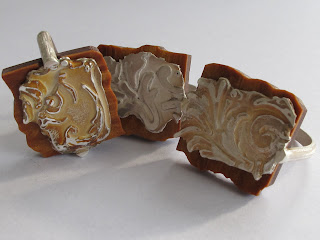
So, while all the epoxy was drying, I pulled out some rings I had made in a class with Tim McCrieght. I liked the idea of the rings but they were too big, even for me, so I thought about what I could do to shrink the interiors so they would fit. I had made a polymer sheet that looked like slabs of wood and it ended up being the right thickness to close up the interior so the rings fit nicely. I love the natural patina on the two rings. The third was in a plastic bag, so no patina as of now. I am still playing with the idea of setting some small white topaz in a couple of the rings. Well, that is all for now...hope you like some of the rings....let me know if you can...I would love to hear from you...have fun in your studios....Kelly

Tuesday, February 15, 2011

Number 6 on board!


Hi everyone,
It has been a busy week and a half! I went down to Va last week and cooked and partied and made a silk felted scarf, which I can't show you since I left it in Va (I think Carol's doggies wanted me to stay and one of them stole it out of my pile of things to be loaded into the car...the little stinker! I bet it was Marly!)
I started the weekend out at my little groupie, Terresa's house for her big birthday party! I helped her cook some of the buffet...made my paprika chicken with saffron rice! YUM!! Stayed up til 3:30 partying with the guests....and then we went to a international market on Sunday and got some steaks for dinner (yeah, the pioneer women recipes!) steak bites with mashers, YUM again!
On Monday, I went over to Carol Hamilton's house so we could play with her embellisher.....Terresa joined us and we ended up going to Alexanderia to the Fibre Space store for silk and wool roving. I also got some beautiful silk yarns to do kumihimo with. We also hit another international market..(that's what happens when Terresa is driving....) got some rose water and orange blossom water for some Moroccan recipes that I have been wanting to try. Lucked out and found some ginger cookies with lemon filling.....and YUM again! Great weekend so far!!
We all went back to Carol's and started our felting with the embellisher. It has 10 needles and no feed-dog so you can free sew with it. We worked for several hours working the roving onto the silk chiffon so we could then put it in the felting machine to felt. I got to wear mine to the local PMC guild meeting. Finally got home on Thursday and started work on my RAW for the week...
So...started one ring and everything was going fine until....dom, dom, dommmmm, the top piece broke into three pieces.....frustrating.....time to start a different ring....started that on Saturday....incorporated three of my favorite mediums...silver sheet, epoxy and polymer clay....my idea of stacking rings....I haven't written in silver so that was a experience that I need to practice, but I do like that it looks hand written...went through 3 drill bits and 5 saw blades. I realized that I should have written everything out with a smaller marker so my lines would have be more spot on and Bur Life would have helped, but all in all, not too bad... I was just going to use a polymer clay sheet that looks like flames but I decided to slide in a sheet of epoxy that had some gold glitter and red ink as a tint. It added a little bit of sparkle behind the openings in the letters. I then fit the polymer sheet so it shows the epoxy sheet as a border. I chemically bonded the whole thing together and then filed down the edges and applied 24kt gold leaf to the polymer edges. I buffed the polymer and I love the way the pattern looks 3-dimensional. I am going to try to finish another ring in the next couple of days since I have a 2-day class with Jeff Devers. My girl Gloria is taking the class too...we are going to have sooooo much fun!! It has been a while since I last saw her...she has been playing in Tucson for a month or so. Anyway, hope you like the ring....and that you are having fun in your studios...Kelly

P.S. I thought I would show you the photo Morgan took with my camera on Saturday morning before I started my second ring...I didn't find them until I downloaded my ring photos...I love the way the sunrise matches my ring colors....too funny, huh? K

Friday, February 4, 2011

Here we are again....


Hi everyone,
I hope you are all keeping warm and having fun in your studios! I have....and now you can see what I have been doing....
I am still playing with these epoxy cones...this time I decided to use the bottom half. I wanted to set one of those fancy rivoli stones that the bead workers are using in their latest pieces and I do love the sparkle! Major bling! So, I thought that by using the bottom, I could make a bezel that the rivoli would fit into and live up to the color of the rivoli. Well, the best laid plans of mice and men....after I had cut out the cone shaped opening, I decided to change my design...again...I had these lovely pearls from my friend, Carol Hamilton, and I decided to use one in the center of the bowl. That was when I decided to use some of the 24ft gold sheet inside the cone. I love the way it makes a halo of light around the pearl. I had planned on using just the cone for the ring...but...it looked so lonely by itself, so I dug around for something I might use to bump up the idea of a raised bezel. I had some small metal clay discs and I domed them and then decided to slide in a epoxy disc in between them. I think it looks like a Dr. Suess stack of plates and bowls (think green eggs and ham)....
I don't solder so I am always looking for creative ways to attach things together. I didn't want to use a wide band but in my scrap, I did find a gold band that a friend had given me when he went out of business about 12 years ago. Did you know that if you smack the crap out of a size 5 gold band with a chasing hammer, you can bring it down to a size 9 with a bit of work?! By beating it so hard, I cracked off the solder and concentrating on the heavier area where the bezels where, I was able to move some major metal. I then made one big spike type rivet out of 16g sterling and used that to hold everything together. I did have to chemically bond the pearl since a 16g piece of wire isn't going into a pearl without a lot of trouble.
I had a lot of fun making this ring. I love when the light shines through the resin and makes the gold glow! I must have smacked the gold band a bit too much because it is a bit too big and sways back and forth on my finger, although, that could also be because it is top heavy!!
And as a last comment...wait until you see what I did with my other epoxy bits....I guess you will have to come back next week to see! I will be hanging out with my friends down in Va for a couple of days....playing in a couple of different studios...making some bronze clay sheets, some felted silk bits....maybe some silk paper for some future rings....just thinking....trying to be open to all the possibilities! Hope you are being open too! Have fun and stay warm! Kelly