Saturday, April 23, 2011

Finally finished....well, maybe!


Hi everyone,
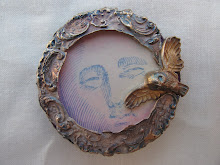
I thought I would show you the finished purse. Although, I am thinking of adding a liner and maybe some little sprinkles of beads near the beaded bezel....but since I want to think about that before I add them (if I do), I am declaring it done! I really had a great time doing this....it combines a lot of my favorite things....fabric, thread, beads, polymer, PMC and glass. I am going to wear it to the Art and Soul Retreat that I am going to next week. I am going to take a weeks worth of classes....some to actually learn something I don't know and some just for fun (those would be the Zentangle classes!). Although, I don't know how to transfer those Zentangle designs to fabric which I am looking forward to. I am hoping I will be albe to transfer them to fabric that I can then work into the nuno felt. Let the games begin!!! I am also taking a class with Chad Alice Hagen...she makes some wild felted pieces and I have seen her work at the ACC shows for years! We are going to learn how to dye the felt in all sorts of different ways! I used to dye fabric and do shibori and Katazome silk painting, so I am excited to see how I can transfer these ideas to felt for my purses....!!!!!
For those of you who are following my rings on the Flickr RAW project...don't give up on me...I have been working on some new rings and will get back to the project when I get back from the retreat. I have 4 or 5 laid out....one has a polymer bezel with the stone laid into the surface and is four fingers long.....one may become a pendant, but we'll see. I am still trying to use little bits and pieces to make these rings so I can try to out wait the cost of silver. I may have to turn in my 5lbs of scrap so I can buy a kiln to do bronze clay in. Who doesn't need four kilns!!? Maybe I should get one for glass and porcelain too!! No, that's just crazy!! One at a time!!!
I may not post while I am at the retreat....depends on how tired I get....I am taking 8 or 9 class in 6 days.....a bit crazy, but I want to get all I can out of the experience! So, I hope you will all have fun in your studios while I am gone....I will try to post, but I am not promising....Kelly

P.S. The photos, in order are, the front of the purse, the second is a close up of some of my polymer and PMC beads and the last photo is the back of the purse showing the bead I used as the closure. Hope you like it......K

Thursday, April 14, 2011

Show News.....


Hi everyone,
Well, I just posted my show news onto the Metal Clay Magazine blogspot and hopefully, Jeanette won't kill me for that, since I didn't yack about metal clay. Oh, well, what are you going to do?? So, I will now tell you all about the work of the last couple of weeks.....I was waiting to go back into the studio after the the kitchen flooded....had to wait for the light to dry out and while I was waiting, I got a call from Darlene to ask if I wanted to share the booth at the show in Philly. I had enough beads and polymer cabs to go with but I wanted something new to have to attach beads to....how many necklaces does a person actually need? So, I decided to make some nuno felt. I had learned how to make nuno felt down at Carol Hamilton's back in Feb and thought that might be a great background to sew beads to. So, I did a lot of research and got a lot of silk tops and wool roving and went to work! My dining room became a make-shift workroom along with the kitchen and I now have multi-colored silk and wool dust bunnies of various sizes all over the house! But I do also have some great looking felted pieces! I was really happy with the response they got! I picked out three pieces for myself to use as samples and then put the rest out for sale. They were like honey to the bees...everyone wanted to come over to the booth and touch them! I started sewing some beads onto one of the sample pieces so I could show everyone what I was thinking what I had mad the felt for. I am making mine into a small cell phone purse, which is funny, since I don't have a cell phone! My friends are hoping that after I am done, I will love my purse so much that I will buy a cell phone! Not! I am doing all the beadwork first and then I will sew up the back seam with some decorative threads or silk ribbons and some sari silk ribbons for the straps with some of my polymer beads as accents. I may put in a liner and a tassel at the bottom, or maybe not.....I will post photos as the work progresses.
On another front, I just wanted to tell everyone that I will be teaching a class with Debbie Taylor and Carol Hamilton at the polymer retreat that is taking place in July in Chicago right before the Metal Clay World Conference. The class is three days long with a day each for metal clay, torch firing enamels and polymer clay. Carol will be teaching the metal clay and Debbie will be doing the enamel bit and I will be doing the polymer clay pod bit. There will be a good bit of experimenting in this class. Let me know if you are interested or have any questions.
Have fun in your studios.....Kelly

The first photo is the piece of felt opened with the beadwork on the part that will be the front. If you click on the photo, you will be able to see more detail. The second and third photos are the class project sample. Comments welcome, Kelly

Monday, March 28, 2011

Just a quick note....


Hi again....
WOW! twice in two days....but this is just a quick note...I thought I would show you a few of the beads I am bringing to the show in Philly on some of my felt....which I think I may have incorrectly labeled as nuno felt....it may be just regular felt with fabric on top. I don't care which it is since I like the look and the fun I have making it. But, I don't want to be saying I am making one thing if I am not, so, there you are....
Anyway, I am hoping you will stop by and see some of my new things...here is a photo of two...see you soon, have fun in your studio...Kelly

Sunday, March 27, 2011

Well, what's new????


Hi everyone,
I thought I would show you what I have been up to! I was working on my RAW project and was planning on going into the studio the next day too finish my ring when my kitchen pipes decided they had had enough time working at our house....I got a bit stressed when I saw water all over the kitchen floor! Had to shut off the water main and wait for Ed to come home to fix everything....good thing he knows how to do all that! I got a new sink and faucet...yea!!! I hate stainless steel sinks!!! I now have a bigger sink, nice white cast iron, and shepherd's crook faucet...I am so loving it! I didn't care for the water pouring through the studio ceiling and wrecking my ring mandrel and dapping block and various other tools....replaceable, so live and learn. I couldn't go and work in the studio since there was water in the light fixture and we had to let that drain so we wouldn't have problems with the electrical.....so I decided to get going on some new projects for a show in April that I am doing with my good friend, Darlene.
I am trying to continue to work in PMC even though the cost has gone through the roof! So, I have started thinking about making smaller charms and one-sided centerpieces that I could use with bead embroidery. I had also played at Carol's house with her Babylock Embellisher and had some ideas about combining the felt I made with the PMC charms. I have now made three sheets of nuno felt and love the process...I have two pieces drying as I write! I am planning on cutting some of the sheets into pieces big enough to make cell phone purses that customers can pick and choose their fabric, maybe add a charm or two or a centerpiece and then some fabric for the straps. They can add embroidery stitches and some beads and personalize their phone purses. Since I don't a cell phone, I am using mine for business cards, credit cards and keys.... have I am hoping to make some up before the show....(which is the Philly Wire Fest show at Valley Forge Convention Center), I am also making some polymer cabs for bead embroidery and to use on the purses....as soon as I finish one up, I will post a photo. By the way, I will be in the booth next to Twisted Sistah with Darlene of D7 Studios...hope some of you can stop by and say hello. I will be making more felt for the next couple of weeks but I will get back to the rings after the show.

I have saved the good news for last.....I was asked to be one of the jurors for the PMC Annual!!! I was so happy to be asked....Thanks, Tim!! I am in the company of three other people...Celie Fago, my first teacher, Robert Ebendorf and Lorena Angelo. I am excited to see all the photos...I hope I do a good job.

I hope you are all having fun creating....I am going back to the machine....Kelly


the photos are as follows.....the first one is before it was felted and the second photo has been felted and the third photo is the same piece before felting.....I think they will look a bit lighter when they dry and the silk shows up a little better, but I love how soft the colors look!!

Thursday, March 10, 2011

New number 10...


Hi everyone,
Well, I am sitting here with my latest ring on typing this out. It was supposed to be a entirely different ring but.....So, to start with, I will tell you what it was supposed to be and how it changed. Originally, it was to have one of my epoxy cones (with red metal flakes) coming up through the copper faceplate. The copper was supposed to be about 1/16th above the silver band, so you could see that the copper faceplate was what was holding the cone in place.
So, then the problems started...first the sterling ring was too big, so that had to be cut down and then when I tried to rivet the faceplate to the sterling band, the faceplate broke after the first one was set. Then the ring didn't have enough tension to hold the cone in and then another piece broke off....finally, I laid it to one side to think over possibilities. So, a month later, this is the result....
I decided I was going to do something with this ring if it killed me....but it didn't! I put on some old world type music and I think that inspired me....I ditched the cone idea (for now) and really looked at the ring. I liked that there was still this space between the sterling band and copper faceplate, so, I looked through some of the PMC pieces that I have (already fired) and found one that was large enough to fill the hole in the faceplate. I was happy that the faceplate was still going to be the part holding the center of interest in place...just not a cone. The disc had a hand imprinted on it and already had two little holes and I was planning on riveting the whole thing in place, so I got some thread out to hold it all together and decided I liked that look better than the rivets. So, I got some pretty turquoise blue silk thread and tied the whole thing up. I wanted the ring to look like it had been broken several times and fixed on the spot rather than being discarded. It was pretty shiny when I was done so I decided that instead of using LOS, I would use paint for the patina. I went over the whole ring and then wiped it down, thread and all!! I then went back and highlighted the thread with a little colored pencil to brighten it up again. I like that it looks dirty. Even with the thread and different edges inside, it is very comfortable to wear.
I have also been trying to design some classes and have been pretty happy with what I have come up with, so we will see how that works out. Some of them may become step by step projects or kits.....so, keep having fun in your studios...and I will too, Kelly

Friday, February 25, 2011

and now, number 7!!!


Hi everyone,
It has been a busy couple of weeks....after I got back from Carol's I had to get ready for my two day class with Jeff Devers. We were going to making boxes with lids....Jeff does some of the most amazing boxes out of polymer clay. We started by making a box out of card stock and then covering them with clay and baked them. We used these as our interior molds. We built up our boxes in layers with a lot of baking and sanding in between (good thing we had a day off to catch up on our "homework"). We then learned how to make two different kinds of fitted lids. It was interesting to see how Jeff works and how he pays so much attention to detail. I would show you a photo of mine but I loaned it to my gal, Gloria, so she could work on her next step.....when I get it back I will put on a decorative layer, bake and sand again...then I will post a photo of the finished piece! Something to look forward to!
In between getting ready for the workshop and the couple of days after, I have been busy in the studio when I haven't been in bed with the flu. I finished off 4 rings that I had in various stages of being finished, and 1 completely new one, so now I am not behind on my RAW!! So, I will start with the new one.....really simple...I had a wonderful piece of copper metal clay that I had textured in Gordon's class with the tearaway method last Feb. I antiqued the surface with acrylic paint and then heat set it before sanding the surface lightly with sandpaper to bring out the details of the little angel. I also had some little bits of already fired metal clay and one of them was a #7 and was just the right size to use on the surface, so I antiqued that with the same colors of acrylic paint. If you look closely, you will see that the little angel looks like he is holding the big ball with one hand and throwing a little ball up in the air with his other hand. The little ball is actually the rivet that holds part of the ring together. Since I don't solder, I needed to figure out how to attach the shank to the band. I decided to use the holes in the #7 disc and the upper right hand corner, which worked out to look like he was tossing a ball in to the air. I liked the way a bit of the band peeked out of the far edge and decided to keep it and then added a little amethyst stone to the sterling band. The little tab also holds the ring in place and keeps it from spinning. It is quite comfortable to wear even though it is off center.
So, for ring number 8, I had a ring cut out from a Faux Bone blank and had experimented with coloring the surface last summer. It has been sitting on my worktable just waiting for the right little something. When I had found my little number 7 disc, I had also found some of the long fragments that I used to make for earrings. I also had a large disc...I hammered that into a bowl so I could set one of those rivoli stones into it and I had a purple one that worked with the surface of the already dyed faux bone ring, so I started assembling the ring. I used two long fragments on the sides and used some sterling headpins to attach everything together. I then found a smaller fragment that fit in between the two that worked out well. When those were attached, I drilled a hole in the faux bone with a round tip bur and set the bowl into it after doming the center section in a smaller divot to conform the bottom of the bowl. I then set the rivoli in and chemically bonded the whole thing together. Yes, I know, it is the easy way out, but have you ever tried to rivet on a ring band? It is hard to flip the ring and hammer on the inside of the band....and since I had to use epoxy to glue the rivoli into the bowl, I really didn't mind.
So, while all the epoxy was drying, I pulled out some rings I had made in a class with Tim McCrieght. I liked the idea of the rings but they were too big, even for me, so I thought about what I could do to shrink the interiors so they would fit. I had made a polymer sheet that looked like slabs of wood and it ended up being the right thickness to close up the interior so the rings fit nicely. I love the natural patina on the two rings. The third was in a plastic bag, so no patina as of now. I am still playing with the idea of setting some small white topaz in a couple of the rings. Well, that is all for now...hope you like some of the rings....let me know if you can...I would love to hear from you...have fun in your studios....Kelly

Tuesday, February 15, 2011

Number 6 on board!


Hi everyone,
It has been a busy week and a half! I went down to Va last week and cooked and partied and made a silk felted scarf, which I can't show you since I left it in Va (I think Carol's doggies wanted me to stay and one of them stole it out of my pile of things to be loaded into the car...the little stinker! I bet it was Marly!)
I started the weekend out at my little groupie, Terresa's house for her big birthday party! I helped her cook some of the buffet...made my paprika chicken with saffron rice! YUM!! Stayed up til 3:30 partying with the guests....and then we went to a international market on Sunday and got some steaks for dinner (yeah, the pioneer women recipes!) steak bites with mashers, YUM again!
On Monday, I went over to Carol Hamilton's house so we could play with her embellisher.....Terresa joined us and we ended up going to Alexanderia to the Fibre Space store for silk and wool roving. I also got some beautiful silk yarns to do kumihimo with. We also hit another international market..(that's what happens when Terresa is driving....) got some rose water and orange blossom water for some Moroccan recipes that I have been wanting to try. Lucked out and found some ginger cookies with lemon filling.....and YUM again! Great weekend so far!!
We all went back to Carol's and started our felting with the embellisher. It has 10 needles and no feed-dog so you can free sew with it. We worked for several hours working the roving onto the silk chiffon so we could then put it in the felting machine to felt. I got to wear mine to the local PMC guild meeting. Finally got home on Thursday and started work on my RAW for the week...
So...started one ring and everything was going fine until....dom, dom, dommmmm, the top piece broke into three pieces.....frustrating.....time to start a different ring....started that on Saturday....incorporated three of my favorite mediums...silver sheet, epoxy and polymer clay....my idea of stacking rings....I haven't written in silver so that was a experience that I need to practice, but I do like that it looks hand written...went through 3 drill bits and 5 saw blades. I realized that I should have written everything out with a smaller marker so my lines would have be more spot on and Bur Life would have helped, but all in all, not too bad... I was just going to use a polymer clay sheet that looks like flames but I decided to slide in a sheet of epoxy that had some gold glitter and red ink as a tint. It added a little bit of sparkle behind the openings in the letters. I then fit the polymer sheet so it shows the epoxy sheet as a border. I chemically bonded the whole thing together and then filed down the edges and applied 24kt gold leaf to the polymer edges. I buffed the polymer and I love the way the pattern looks 3-dimensional. I am going to try to finish another ring in the next couple of days since I have a 2-day class with Jeff Devers. My girl Gloria is taking the class too...we are going to have sooooo much fun!! It has been a while since I last saw her...she has been playing in Tucson for a month or so. Anyway, hope you like the ring....and that you are having fun in your studios...Kelly

P.S. I thought I would show you the photo Morgan took with my camera on Saturday morning before I started my second ring...I didn't find them until I downloaded my ring photos...I love the way the sunrise matches my ring colors....too funny, huh? K